
How to Install a French Cleat System

A cluttered workshop is more than just an eyesore; it is a significant barrier to productivity and safety. When every tool change requires a five-minute search through a pile of sawdust and offcuts, your creative momentum stalls. This is where the French cleat wall comes in—a gold standard in workshop organization that offers unparalleled flexibility. Unlike fixed shelving or flimsy pegboards, a French cleat system allows you to reorganize your entire tool collection in seconds as your needs evolve.
In this comprehensive guide, we will walk you through the process of designing, cutting, and installing a heavy-duty French cleat system. You will learn the specific physics that makes this system so strong, the best materials to use for longevity, and the step-by-step installation process to ensure your wall is perfectly level and capable of holding hundreds of pounds. Whether you are a weekend hobbyist or a professional woodworker, mastering the French cleat wall will transform your workspace into a highly efficient "machine" for making.
Table of Contents
- Understanding the French Cleat System
- Selecting the Right Materials and Tools
- Step-by-Step Installation Guide
- Designing Custom Tool Holders
- Pro Tips and Common Mistakes to Avoid
- Frequently Asked Questions
Understanding the French Cleat System
The French cleat is a deceptively simple mechanical joint that relies on a 45-degree angle and the force of gravity to create a secure, load-bearing connection. The system consists of two main components: a wall-mounted strip with a 45-degree bevel facing upward and away from the wall, and a corresponding "mating" cleat attached to the back of a tool holder or cabinet with a 45-degree bevel facing downward and toward the wall. When the two bevels interlock, the weight of the tool pulls the cleat tighter against the wall, creating a rock-solid mount without the need for additional fasteners.
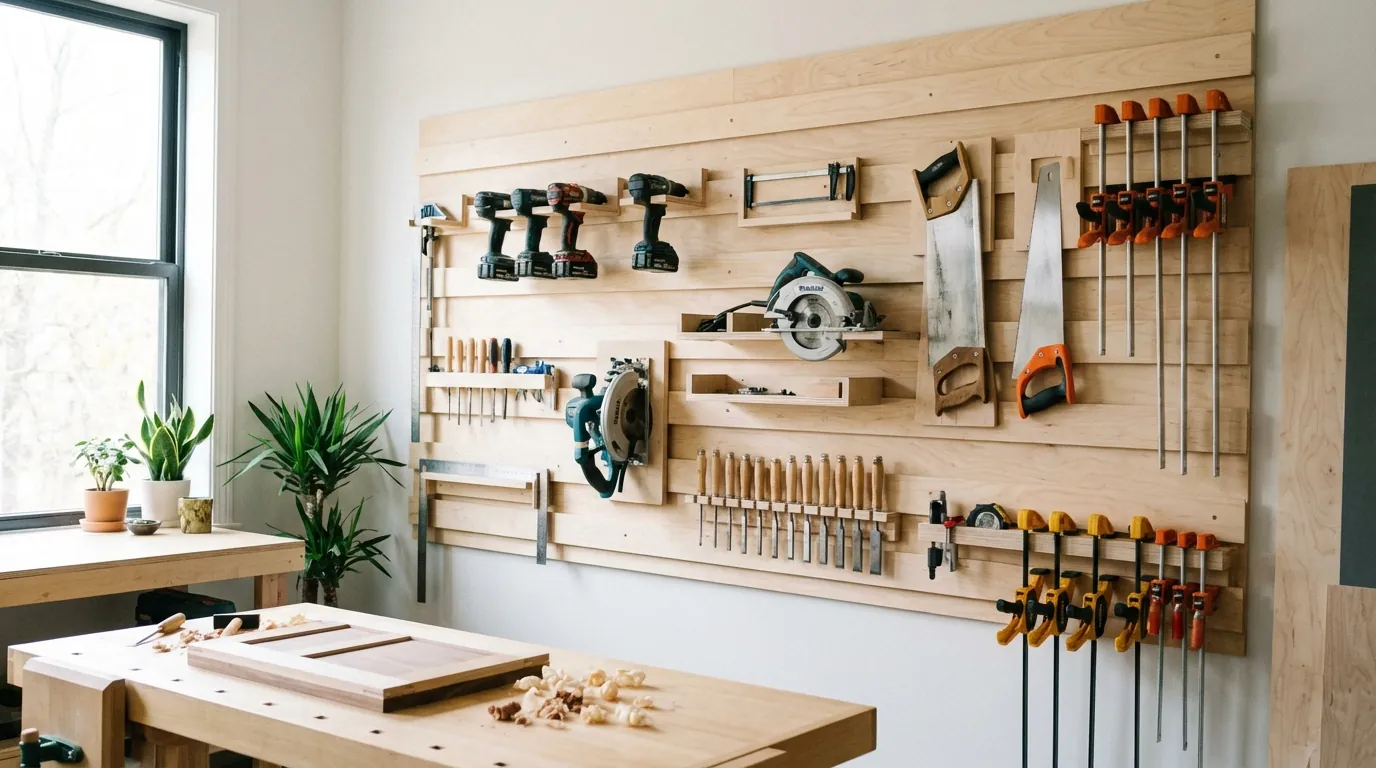
Historically used in the architectural millwork industry for hanging heavy mirrors and cabinets, the French cleat has been adopted by the woodworking community because of its modular nature. Unlike a pegboard, which can struggle with heavy power tools or awkward shapes, a French cleat wall can be customized to support anything from a single marking knife to a heavy miter saw station. Because the cleats run horizontally across the wall, you have the freedom to slide tool holders left or right, or move them to different rows entirely, allowing your shop layout to grow with your tool collection.
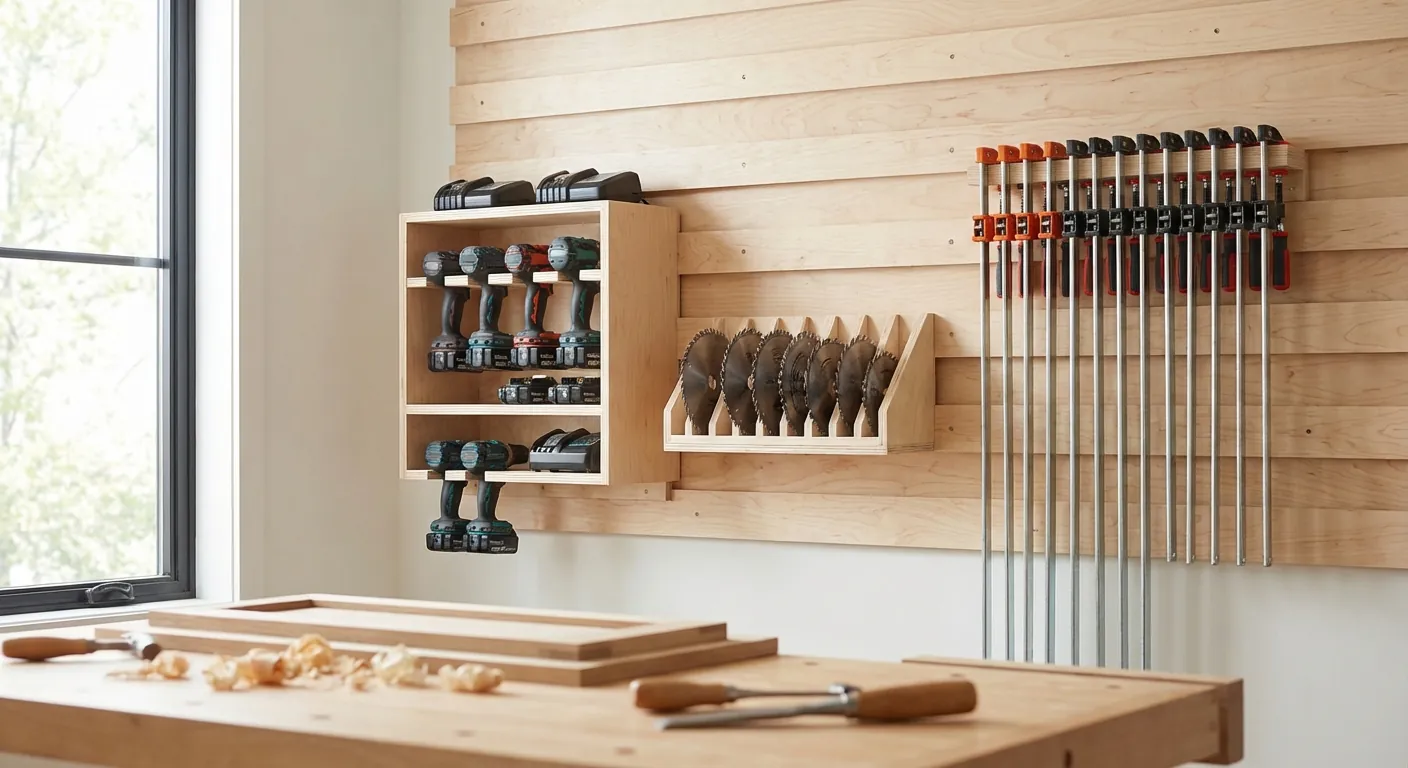
The primary advantage of the French cleat wall over other storage solutions is its sheer strength and surface area contact. While a hook on a pegboard concentrates all the weight on a tiny point of a perforated board, a French cleat distributes the load across the entire length of the plywood strip and directly into the wall studs. This makes it the ideal choice for storing heavy items like cordless drill sets, sanders, and even small air compressors. Furthermore, the wooden nature of the system allows you to screw, glue, and modify your tool holders infinitely, which is impossible with metal or plastic proprietary systems.
Selecting the Right Materials and Tools
When building a French cleat wall, the choice of material is the most critical decision you will make regarding the system's longevity. For the cleats themselves, 3/4-inch (18mm) plywood is the industry standard. However, not all plywood is created equal. While standard construction-grade CDX plywood is affordable, it often contains internal voids and can warp over time. For a professional-grade wall, Baltic Birch or a high-quality cabinet-grade maple plywood is highly recommended. These materials feature more layers and fewer voids, ensuring that the 45-degree beveled edge remains sharp and structurally sound under heavy loads.
In addition to the plywood, you will need high-quality fasteners to secure the cleats to your wall. Since the system relies on the wall studs for support, 2.5-inch or 3-inch cabinet screws are preferred over standard drywall screws. Drywall screws are brittle and can snap under the shear force exerted by a heavily loaded tool wall. Cabinet screws, often featuring a built-in washer head and a star drive (Torx), provide superior holding power and are less likely to strip during installation. If you are mounting to a concrete or brick wall, you will need high-quality masonry anchors or Tapcon screws to ensure the foundation of your system doesn't fail.
Precision is the final ingredient in a successful build. You will need a reliable way to cut consistent 45-degree angles across long strips of plywood. While a table saw is the most efficient tool for this, a circular saw with a high-quality track or guide can produce excellent results. You will also need a long level (at least 4 feet) to ensure your cleats are perfectly horizontal. Even a slight tilt across an 8-foot span can cause tool holders to slide on their own or look visually jarring.
{{PRODUCT_CARD:B0000224C4}}
The Stabila 37448 48-Inch Type 196 Spirit Level is a tool I recommend for any workshop organization project, especially for French cleat installation. When you are mounting horizontal cleats across an entire wall, any slight deviation from level becomes magnified. This level is best for woodworkers who want a "set it and forget it" tool that remains accurate even after being dropped on a concrete floor.
The standout feature of this level is its certified accuracy and the way the vials are permanently bonded into the frame. Unlike cheaper levels where the vials can shift over time, the Stabila provides a consistent reading that you can trust when marking your stud lines and cleat positions. The hand holes make it easy to hold against the wall while you are trying to drive a screw with your other hand.
The only drawback is the price; it is a significant investment compared to big-box store levels. However, given that a French cleat wall relies entirely on horizontal alignment for its modularity and aesthetics, having a professional-grade level prevents the "slanted tool" look that plagues many DIY shops. Compared to digital levels, this spirit level is more intuitive and requires no batteries, making it a reliable shop staple.
{{/PRODUCT_CARD}}
Step-by-Step Installation Guide
The first step in the installation process is "ripping" your plywood into strips. Start by cutting your 3/4-inch plywood into 4-inch or 5-inch wide strips. Once you have several long strips, tilt your saw blade to exactly 45 degrees. You will then rip these strips down the middle. This single cut creates two cleats: one for the wall and one for your tool holders. It is vital to use a sharp, high-tooth-count blade to prevent splintering on the thin edge of the bevel. If you are using a table saw, ensure your fence is perfectly parallel to the blade to avoid kickback or an inconsistent angle.
Once your cleats are cut, it is time to prepare the wall. Use a stud finder to locate every vertical stud in the area where the wall will be installed. Mark the center of these studs from the floor to the ceiling using a chalk line or a long straight edge. This is a critical step because the strength of the French cleat system comes from its connection to the framing of your building, not the drywall. If you miss the studs, the weight of your tools will eventually pull the cleats right out of the wall, potentially causing damage to your tools or injury.
Spacing and Alignment
The spacing between your wall cleats depends on the size of the tools you plan to hang. A common standard is to leave 6 to 10 inches of space between the top of one cleat and the top of the next. This provides enough "dead space" for tool holders to hang without overlapping the row below. Use a spacer block—a scrap piece of wood cut to your desired interval—to ensure perfectly consistent spacing as you move up the wall. This saves you from having to measure and level every single row individually; once the bottom row is level, the spacer block ensures the rest follow suit.
When mounting the first row, start at the bottom and work your way up. Hold the cleat against your stud marks, place your level on top, and drive a single screw into the center stud. Re-check the level, then drive screws into every stud along the length of the cleat. For maximum strength, use two screws per stud if your cleat is wider than 3 inches. Repeat this process for each subsequent row, using your spacer block and checking with a level every two or three rows to ensure no errors have accumulated.

Designing Custom Tool Holders
The real magic of a French cleat wall happens when you begin building the tool holders. A tool holder consists of two parts: the backplate (which has the mating 45-degree cleat attached) and the "business end" (the hooks, shelves, or slots that hold the tool). When building these, always use the same 3/4-inch plywood for the mating cleat to ensure a perfect fit with the wall. A common mistake is to make the tool holder backplate too small. A larger backplate provides more surface area to rest against the wall, preventing the tool holder from "tipping" forward or wobbling when you grab a tool.
For specific tools, think about how you naturally use them. A drill dock, for example, should have slots that allow the drills to hang upside down by their handles, with a shelf above for chargers and batteries. For hand tools like chisels or screwdrivers, a simple block of wood with appropriately sized holes drilled through it can be glued and screwed to a backplate. The beauty of this system is that you can build a prototype holder in ten minutes, test it for a week, and if it doesn't work, you can simply unscrew the cleat and try a different design without leaving any holes in your wall.
Modular storage also means you can create "kits" for specific tasks. You might have a "Sanding Station" cleat holder that contains your random orbital sander, various grits of sandpaper, and a dust port adapter. When you need to sand a project, you can move that entire module to the cleat closest to your workbench. When you're done, it slides back to its storage position. This level of workflow customization is what separates a professional workshop from a cluttered garage.
Pro Tips and Common Mistakes to Avoid
One of the most frequent mistakes beginners make is failing to account for "cleat compression." Over time, the heavy weight of tools can cause the 45-degree beveled edges to compress or "mushroom," especially if you use softwoods like pine. To prevent this, always use hardwoods or high-density plywood for the cleats. Additionally, adding a small "heel" or a secondary strip of wood at the bottom of a large tool holder can help distribute the weight more evenly against the wall, reducing the leverage force on the beveled joint itself.
Another pro tip is to incorporate a "locking" mechanism for tool holders that you use frequently. While gravity does most of the work, a tool that is pulled outward (like a tape measure or a heavy drill) can sometimes lift the holder off the cleat. To prevent this, you can drive a single small screw through the bottom of the tool holder into the wall cleat once you’ve found its permanent home. Alternatively, some woodworkers use a "rotating thumb turn" made of scrap wood that locks the holder in place but can be turned easily if the holder needs to be moved.
Finally, don't forget about dust management. The beveled edge of the wall cleat acts as a natural shelf for sawdust to accumulate. If enough dust builds up in the "V" of the joint, the mating cleat won't seat properly, leading to an unstable and potentially dangerous connection. To mitigate this, many experts recommend cutting a small "dust relief" or a 1/8-inch flat at the very bottom of the 45-degree cut on the wall cleat. This gives the sawdust a place to fall without interfering with the mechanical connection of the two beveled faces.
Frequently Asked Questions
What is the best thickness of plywood for a French cleat wall?
The gold standard for French cleat systems is 3/4-inch (18mm) plywood. This thickness provides the necessary structural integrity to hold heavy tools and allows for a substantial 45-degree bevel that won't easily snap or deform. While 1/2-inch plywood can be used for smaller, lighter tool walls, it often lacks the "meat" required for deep screws and can flex under the weight of larger power tools. Using 3/4-inch material also ensures that your tool holders have a wide enough base to sit flush against the wall without wobbling.
For those looking to save money, you can use 1/2-inch plywood for the tool holders themselves, but the cleats—both on the wall and the mating pieces—should ideally remain 3/4-inch. This consistency ensures that every accessory you build will fit every row of your wall perfectly. Mixing thicknesses for the cleats can lead to alignment issues where some holders sit further away from the wall than others, compromising the stability of the system.
How much weight can a French cleat system actually hold?
When properly installed into wall studs, a French cleat system is incredibly strong and can easily support hundreds of pounds. The weight capacity is less about the wooden cleat itself and more about the fasteners used and the strength of the wall studs. A single 4-foot cleat screwed into three or four studs with 3-inch cabinet screws can support the weight of a heavy kitchen cabinet or a full rack of clamps without issue. The 45-degree angle converts the downward pull of gravity into a force that pushes the tool holder tighter against the wall.
However, the "leverage" of the tool holder matters. A shallow shelf holding heavy weights puts less stress on the cleat than a long, deep arm extending 20 inches from the wall. For very heavy or deep items, it is important to make the backplate of the tool holder taller. A taller backplate increases the vertical distance between the cleat and the bottom of the holder, which reduces the leverage force trying to pull the cleat away from the wall.
Do I need to use glue when installing the wall cleats?
While some woodworkers choose to glue their cleats to the wall for "permanent" strength, it is generally not recommended if you are mounting over drywall. Glue does not bond well to the paper surface of drywall, and if you ever need to move or remove the system, you will cause significant damage to the wall. The mechanical strength provided by high-quality screws driven into studs is more than sufficient for almost any workshop application.
On the other hand, you should always use glue and screws when attaching the mating cleat to the back of your tool holders. Because these holders will be moved, bumped, and loaded repeatedly, the glue provides the necessary shear strength to ensure the cleat never detaches from the holder. A combination of wood glue and 1-1/4 inch screws is the standard approach for building durable, shop-tested accessories.
How do I stop tool holders from sliding left and right?
The modularity of the French cleat system means that holders can slide horizontally along the row. In most cases, the weight of the tool and the friction of the wood-on-wood connection are enough to keep things in place. However, if you have a tool that vibrates (like a small wall-mounted sander station) or if your wall isn't perfectly level, holders might shift. The simplest fix is to add a small "stop block" or a screw at the end of the row.
For a more elegant solution, you can cut small notches into the wall cleat and add a corresponding "tab" to your tool holders. However, this limits the modularity of the system. Most woodworkers find that simply ensuring the wall is level during installation eliminates 95% of sliding issues. If a specific holder still moves, a small piece of adhesive-backed sandpaper or a rubber shim on the back of the holder will provide enough extra friction to keep it stationary.
Can I install French cleats on a concrete or cinder block wall?
Yes, French cleats can be installed on masonry walls, but the process requires different fasteners. Instead of standard wood screws, you must use masonry anchors or Tapcon-style concrete screws. It is highly recommended to first install "furring strips" (vertical 2x4s or 3/4-inch plywood strips) to the concrete wall using anchors, and then screw your French cleats into those strips. This creates a small air gap behind the wood, which helps prevent moisture from the concrete from warping your cleats.
When mounting to concrete, ensure your anchors are rated for the total expected weight of the wall. Because you cannot simply "find a stud," you have the freedom to space your vertical furring strips every 16 inches to mimic standard framing. This provides a consistent and reliable substrate for your French cleat system, ensuring that your tool wall is just as strong as one built on a traditional stud wall.
Our Top Picks for 2026
We've spent hours researching and testing to find the absolute best options currently available.

Uniclife 2 Pairs 12 Inch French Cleat Hanger 80 lbs Load Heavy Duty French Cleat Picture Hanger Aluminum Alloy Mirror Hanging Hardware Wall Mounting Bracket Interlocking Z Bar Clip with Bubble Level
- 80 lb Load Capacity: Built with robust aluminum alloy and antirust coatings, these French cleat hangers confidently support heavy items up to 80 pounds (36 kg). Significantly minimize wobbling or falling risks in your home or workspace
- Hidden & Near-Flush: With an ingenious Z-bar design, the French cleat picture hangers disappear completely behind your items, creating a clean, professional look anywhere. They almost sit flush against the wall, giving mounted items a floating appearance
- Quick Installation: Fast setup takes just minutes – mark and drill mounting holes on your wall after checking with the bubble level, fix one plate with the anchors and long screws, then secure another plate on your item with short screws and hang it up

OOK French Cleat, Picture and Mirror Hanger with Hardware, 100lb, Aluminum, 533208 12" Length, 100lb
- The french cleat allows for level picture/mirror and art hanging every time for a reliable, neat aesthetic
- The french cleat features interlocking brackets for added safety and security
- The OOK Hangman French Cleat includes durable mounting screws for a reliable display of your art, mirror and pictures

FURWEY French Cleat, Picture and Mirror Hanger, Aluminum French Cleat, Headboard Wall Mounting Brackets with Screws(12 Inch-1 Pair, Support 80 lbs) 12inch-1Pair
- What You Will Get: The package includes 1 pair aluminum alloy French cleat, 4 X short screws, 4 X long screws, 4 X expansion tubes, 1 X level tool, including all the accessories needed for quick and easy installation.
- Easy to Install: The French cleat hanger is suitable for most wall materials, such as gypsum board,wooden walls, etc. It is very easy to install. Simply fix the French style hook to the wall and item with screws to complete the installation.
- High Quality Material: The French cleat hanger is made of aluminum alloy and allows for use on non vertical walls, providing better support and enhanced safety for your precious art paintings or mirrors.