
How to Label Your Workshop for Efficiency

Table of Contents
- The Psychology of an Organized Workshop
- Categorizing Your Inventory for Maximum Flow
- Choosing the Right Workshop Labeling System
- Essential Tools for Professional Labeling
- Color Coding and Visual Cues
- Durability: Labeling for the Shop Environment
- Pro Tips and Common Mistakes to Avoid
- Frequently Asked Questions
The Psychology of an Organized Workshop
Every woodworker has experienced the "search-and-rescue" mission that occurs in the middle of a critical glue-up. You need a specific 1/4-inch spacer or a particular grit of sandpaper, and suddenly, your creative momentum grinds to a halt as you rummage through unlabeled drawers. Implementing a comprehensive workshop labeling system is not about being "neat" for the sake of appearances; it is about reducing the cognitive load on your brain. When every item has a clearly defined home marked by a legible label, you free up mental energy to focus on the precision of your joinery rather than the location of your tools.
A well-labeled shop also significantly improves safety and workshop longevity. When containers are clearly marked, you are less likely to grab the wrong solvent or use a dull blade that was meant for the scrap pile. Furthermore, an organized system encourages "return-to-home" behavior. It is much easier to put a tool back where it belongs when the spot is literally calling out for it. This prevents the "piling effect" on workbenches, which is a leading cause of workshop accidents and misplaced measuring tools.
Finally, a labeling system makes your shop accessible to others. Whether you are teaching a child the craft, working with a partner, or having a friend help with a heavy assembly, labels eliminate the constant need for "Where is the...?" questions. It transforms a private, confusing space into a professional environment where anyone can find the safety gear, the first aid kit, or the correct fastener without a guided tour.
Categorizing Your Inventory for Maximum Flow
Before you start printing labels, you must establish a logical categorization system. The most effective method is the "Zone" approach. Zone A consists of high-frequency items like tape measures, pencils, and commonly used chisels, which should be stored at eye level or within arm's reach of your primary workbench. Zone B includes secondary tools like router bits, specialty planes, and sanding blocks. Zone C is reserved for long-term storage, such as bulk fasteners, seasonal tools, or finishing supplies that are only used at the end of a project.
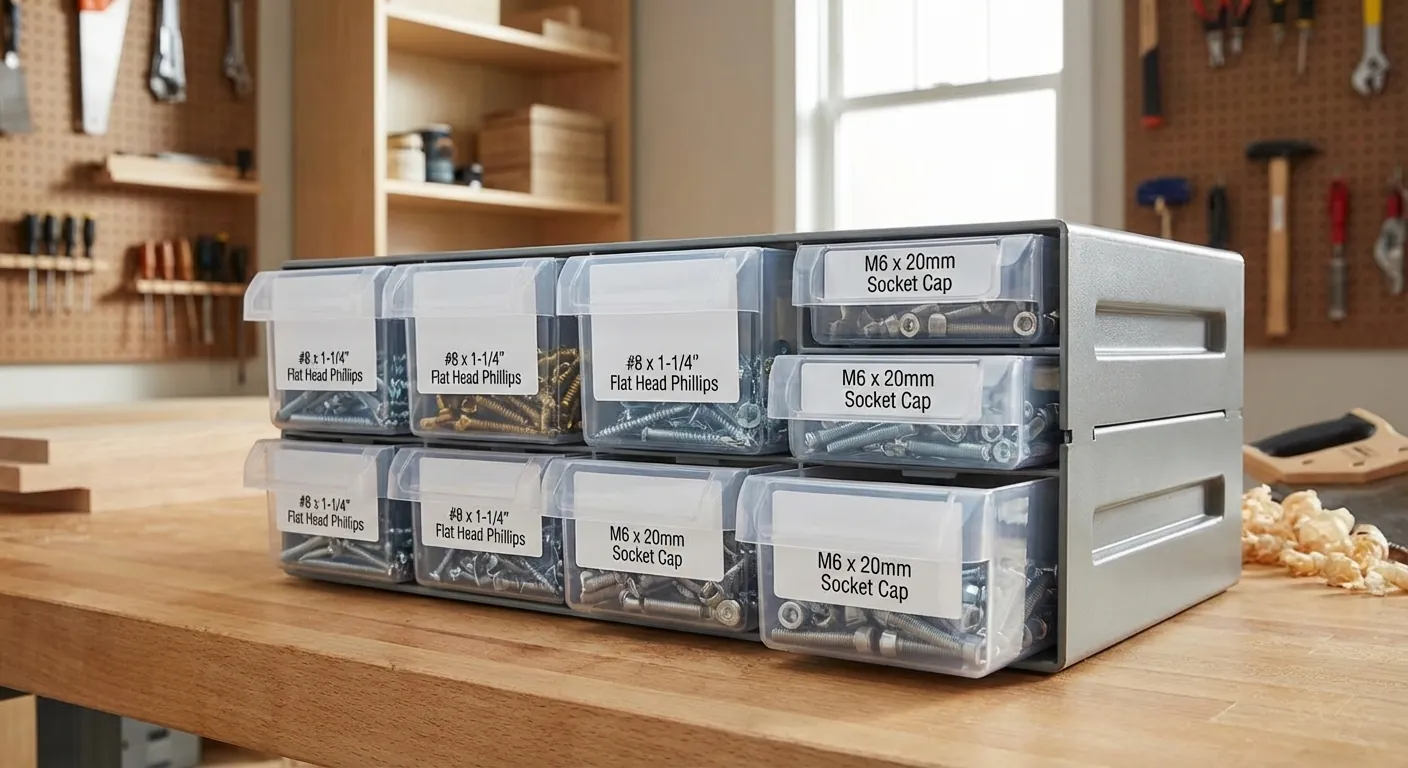
When categorizing fasteners, detail is your best friend. Labeling a bin "Screws" is almost as useless as no label at all. Instead, use a hierarchical system: Material (Wood, Machine, Sheet Metal) -> Head Type (Torx, Phillips, Square) -> Length and Gauge. For example, a label should read "Wood Screw - Torx - 2.5" #8." This level of specificity ensures that you never accidentally grab a fine-thread screw for a coarse-thread application, saving you from stripped wood and frustrated rework.
Don't forget to categorize your consumables and scrap wood. Sandpaper should be labeled by grit and type (e.g., "5-inch Hook & Loop - 120 Grit"). Finishing supplies should be grouped by base (Oil vs. Water) to prevent accidental mixing. For your lumber rack, labeling wood species and thickness can save you from pulling down a heavy 8/4 slab of White Oak when you were actually looking for Ash. The goal is to create a visual map that guides your movement through the shop.
Choosing the Right Workshop Labeling System
There are three primary schools of thought when it comes to labeling: hand-written, printed adhesive, and magnetic/interchangeable. Hand-written labels using a permanent marker on masking tape are the quickest and cheapest, but they often peel in humid shops and can become illegible over time. If you choose this route, use high-quality painter's tape and a industrial-strength marker. However, for a permanent workshop solution, digital label makers are the gold standard because they provide uniform, high-contrast text that is easy to read from a distance.
Printed adhesive labels offer the most professional look and the highest durability. Modern thermal printers create labels that are resistant to water, oil, and many workshop chemicals. They allow you to choose font sizes that are appropriate for the container—large fonts for overhead bins and smaller fonts for tiny hardware drawers. Some advanced systems even allow for QR codes, which can link to digital manuals for your power tools or inventory spreadsheets for your hardware.
For shops that frequently reconfigure their storage, magnetic labels or "card-holder" style labels are ideal. These allow you to slide a new paper label in or move a magnetic strip to a different drawer without leaving sticky residue behind. This is particularly useful for tool chests where you might rearrange your wrench or socket sets as your collection grows. Choosing the right system depends on your shop's environment and how often you expect to change your layout.
Essential Tools for Professional Labeling
To achieve a consistent and durable workshop labeling system, you need the right hardware. While a Sharpie works in a pinch, a dedicated label maker ensures that your shop remains organized for years. Below are the top recommendations for woodworking environments.
{{PRODUCT_CARD:B0BGYP2N9G}}
The Brother P-touch PTD610BT is the ultimate professional choice for a serious workshop. I recommend this model specifically because it bridges the gap between a standalone device and a computer-connected tool. For woodworkers who want to include symbols, barcodes, or even small graphics of tools on their labels, the Bluetooth connectivity and PC software are game-changers. It is best for those setting up a brand-new shop or undergoing a major reorganization where hundreds of labels are needed.
The standout feature is the high-resolution color display, which lets you see exactly how the label will look before you waste expensive tape. It uses TZe tapes, which are laminated and incredibly resistant to the sawdust, moisture, and grease found in a woodworking environment. The only real drawback is the price point and the size of the unit; it’s a desktop machine, not something you’ll toss in a tool bag. Compared to cheaper handheld models, the 610BT offers much faster typing and more font options, making it a "buy once, cry once" investment for shop organization.
{{/PRODUCT_CARD}}
{{PRODUCT_CARD:B01GQHHYFE}}
For the hobbyist or the woodworker on a budget, the Brother P-touch PTD210 is the industry standard for a reason. I recommend this for small to mid-sized shops where portability is key. It’s lightweight and easy to use with one hand while you’re standing on a ladder labeling your upper cabinets. It features a variety of "one-touch" keys that make it simple to change font styles or add frames without digging through complex menus.
The standout feature here is the library of pre-designed templates, which allows you to create stylish labels quickly. It uses the same durable TZe tape as the more expensive models, meaning your labels won't fade or peel in the shop. The main drawback is the lack of a QWERTY keyboard (it uses an ABC layout), which can be frustrating for fast typists. Additionally, it lacks PC connectivity. However, compared to a manual embosser, it is infinitely more legible and reliable.
{{/PRODUCT_CARD}}
{{PRODUCT_CARD:B005X9VZ70}}
The DYMO LabelManager 160 is the perfect entry-level electronic labeler for those who prefer a QWERTY keyboard layout. I recommend this for woodworkers who want a simple, no-frills device that gets the job done without a steep learning curve. It is best for labeling plastic bins, drawer fronts, and power tool cases. The interface is very intuitive, featuring bold, italic, and underline options at the touch of a button.
One of the best features is the automatic power-off function, which saves battery life—a common issue with shop tools that sit in a drawer for months. A potential drawback is that DYMO D1 tapes are generally considered slightly less durable than Brother's laminated TZe tapes in high-moisture environments. However, for interior cabinet labeling, it performs excellently. It’s a compact, affordable alternative to the Brother ecosystem.
{{/PRODUCT_CARD}}
{{PRODUCT_CARD:B00006B8FZ}}
Sometimes, small label makers aren't enough, especially for large storage totes or lumber racks. I recommend Avery Printable Labels for these high-visibility applications. These are best for woodworkers who want to print full-sheet labels from their home office printer. You can create large-format labels (up to 2" x 4" or larger) that can be read from across the shop.
The standout feature is the "Sure Feed" technology, which prevents jams in your printer—a lifesaver when you're printing a batch of 50 labels for your fastener wall. The "TrueBlock" technology is also fantastic because it completely covers up any old markings or labels underneath, allowing you to reuse old bins easily. The drawback is that these are paper-based, so they aren't as resistant to oils or solvents as plastic tapes unless you clear-coat them with a bit of spray lacquer.
{{/PRODUCT_CARD}}
Color Coding and Visual Cues
A truly efficient workshop labeling system goes beyond text; it incorporates visual cues that the brain can process faster than reading. Color coding is the most effective way to do this. For example, you might use red labels for anything related to "Cutting" (saw blades, chisels, knives), blue for "Measuring and Marking," and yellow for "Safety Gear." When you look at your tool wall, your eyes will naturally gravitate toward the correct color zone before you even read a single word.
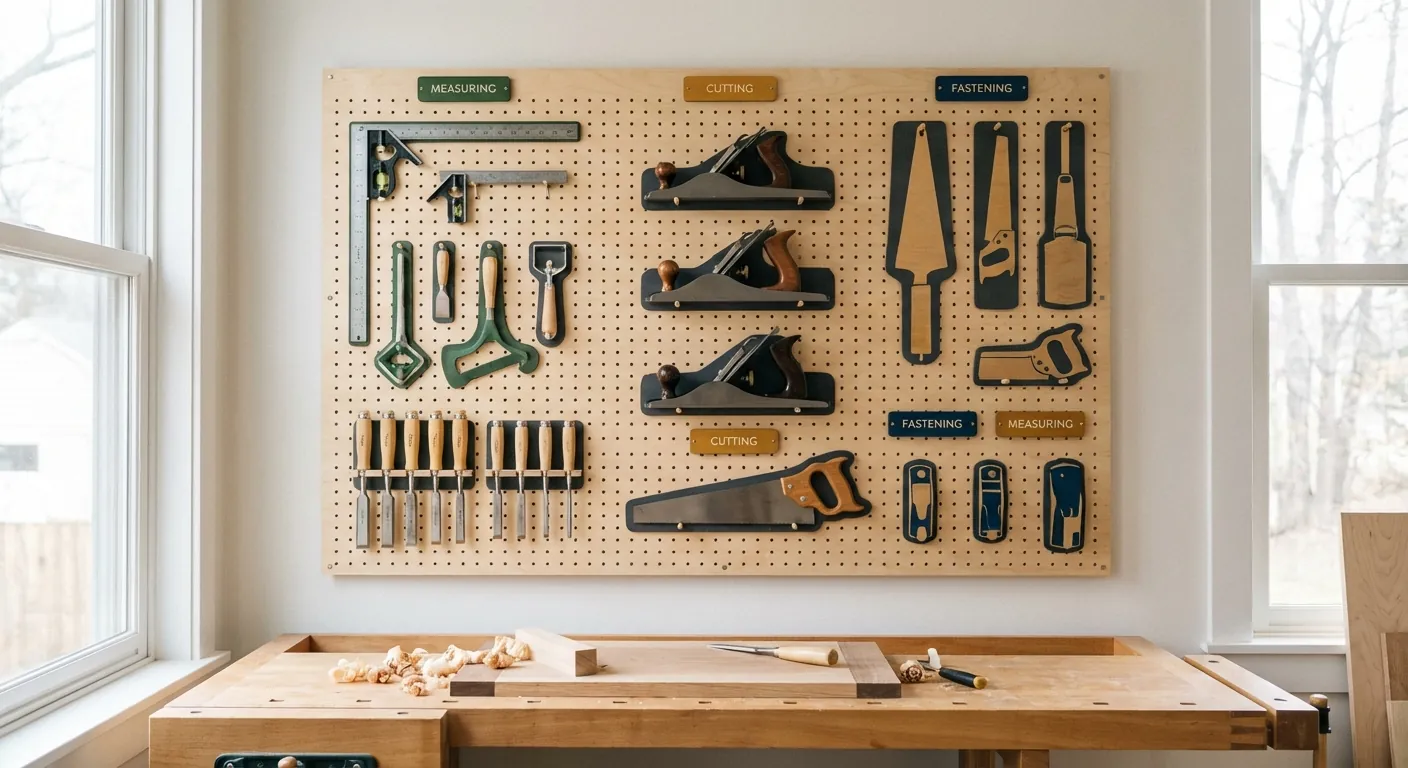
Another powerful visual cue is the "Shadow Board" or "Silhouette" method. By tracing the outline of a tool on a piece of Kaizen foam or a pegboard, you create an instant visual label. When the tool is missing, the empty silhouette acts as a "label" telling you exactly what is gone. This is particularly effective for hand tools like squares, hammers, and planes. Combining a printed text label with a color-coded background or a silhouette creates a multi-layered system that is nearly impossible to mess up.
You can also use physical samples as labels. For fastener bins, many woodworkers hot-glue one sample of the screw or bolt to the front of the bin. This allows for instant tactile and visual identification. If you are looking for a specific bolt, you can simply compare the one in your hand to the one on the bin face. This "physical labeling" is incredibly robust and works even when your hands are covered in sawdust or glue.
Durability: Labeling for the Shop Environment
The workshop is a hostile environment for standard office supplies. Sawdust acts as an abrasive, humidity causes paper to curl, and oils can dissolve many adhesives. To ensure your workshop labeling system lasts, you must prioritize durability. If you are using adhesive labels, always clean the surface with denatured alcohol or a degreaser before applying. Even a microscopic layer of sawdust will prevent the adhesive from bonding correctly, leading to "label curl" within a few weeks.
For labels that will be exposed to heavy wear—such as those on the handles of power tools or on the edge of a workbench—consider "over-labeling." This involves placing a piece of clear packing tape or a dedicated label protector over the printed label. This creates a sacrificial layer that can be wiped clean or replaced if it becomes too scratched. For thermal labels, be aware that extreme heat (like leaving a labeled tool in a hot van) can sometimes blacken the label, though modern laminated tapes are much more resilient to temperature swings.
For long-term lumber storage or outdoor equipment, consider using embossed metal tags or engraved plastic. While more expensive and time-consuming to create, these labels are impervious to UV light, moisture, and solvents. In a woodshop, a common trick is to use a small piece of wood as the label itself, wood-burning the name of the contents into it. This fits the aesthetic of the shop and is as permanent as the furniture you are building.
Pro Tips and Common Mistakes to Avoid
One of the biggest mistakes woodworkers make is labeling the container rather than the shelf. If you have a row of identical bins on a rack, and you label the bins, you have to be careful to put the "Screws" bin back in the "Screws" spot. If you label the shelf instead, the home for that item is fixed in space. Ideally, you should label both the bin and its designated spot on the shelf to ensure that the entire system remains organized even when multiple bins are in use at once.
Avoid using "Misc" or "General" labels at all costs. These are the graveyards of organization. As soon as you have a bin labeled "Misc," it will inevitably fill up with items that actually belong in a specific category, simply because it’s the path of least resistance. If you find yourself with items that don't fit your current categories, it’s a sign that you need to create a new, specific category or purge items you no longer need. Specificity is the engine of efficiency.
Lastly, don't over-label. You don't need a label that says "Table Saw" on your table saw. Labeling the obvious only adds visual clutter. Focus your efforts on the things that are hidden (inside drawers), the things that look similar (different types of drill bits), and the things that have specific locations (hand tool racks). A clean, focused labeling system is much more effective than one that labels every square inch of the shop.
Frequently Asked Questions
What is the best font size for workshop labels? For most drawer fronts and bins, a font size of 18pt to 24pt is ideal. This allows you to read the label from a comfortable standing distance without having to lean in. For overhead storage or large totes on high shelves, you should go as large as your label maker allows, often 36pt or higher. The goal is "glance-ability"—you should know what is in the box before you even reach for it.
Consistency is also key. Try to use the same font and size for similar types of items. For example, all your hand tools could be in a Bold Sans-Serif font, while all your fasteners are in a condensed font to fit more technical data. This consistency helps your brain categorize information faster as you scan the shop.
How do I label plastic bins so the labels don't fall off? Many plastic storage bins are made from polypropylene or polyethylene, which are "low surface energy" plastics that naturally repel adhesives. To make labels stick, first clean the area thoroughly with isopropyl alcohol. If the label still won't stick, you can lightly scuff the area with a high-grit sandpaper (400 grit) to create some "tooth" for the adhesive, then clean it again before applying the label.
Another professional trick is to use a heat gun on a very low setting to gently warm the label after application. This softens the adhesive and helps it "wet out" into the textures of the plastic. Be careful not to melt the plastic or the label; just a few seconds of warmth is enough to significantly improve the bond strength.
Should I use a labeling system with pictures or just text? For most adults, text is sufficient and faster to produce. However, pictures (icons) are processed by the human brain much faster than text. If you have a high-end label maker like the Brother PTD610BT, adding a small icon of a hammer or a screw next to the word can speed up your recognition time. Icons are also incredibly helpful if you have children or non-woodworking family members who use the shop.
If you don't want to print icons, color-coding is a great middle ground. A red label with the text "Chisels" provides two data points: the color tells you it's a cutting tool, and the text confirms which one. This redundancy makes your workshop labeling system much more robust and user-friendly.
How often should I update my workshop labels? You should view your labeling system as a "living document." A shop is never truly finished; tools come and go, and your workflow will evolve. A good rule of thumb is to do a "label audit" once a year. If you find a bin that is empty, or a label that no longer matches the contents, update it immediately. If a label is peeling or faded, replace it before it falls off and you forget what was in the drawer.
When you buy a new tool or a new set of hardware, make it a habit to print the label before you put the item away. If you tell yourself you'll do it "later," that item will likely sit in an unlabeled "temporary" spot for six months. Integrating labeling into your "new tool day" routine ensures the system never breaks down.
Can I use a regular office printer for workshop labels? Yes, you can use a regular inkjet or laser printer with full-sheet adhesive paper (like Avery labels). This is often the most cost-effective way to create large batches of labels or very large labels for lumber racks. However, keep in mind that inkjet ink is water-soluble. If a drop of water or oil hits an inkjet label, the text will likely smear.
If you use an office printer, it is highly recommended to "laminate" the labels by covering them with clear packing tape or spraying them with a clear acrylic sealer. This protects the ink from the shop environment. For long-term durability and ease of use, a dedicated thermal label maker is usually a better investment for the average woodworker.
Our Top Picks for 2026
We've spent hours researching and testing to find the absolute best options currently available.

18 Pack of Tool Box Labels, New 3D-Printed Magnetic Tool Box Labels, Magnetic Toolbox Labels Reusable Tags for Steel Toolboxes, Carts, Drawers, and Cabinets(18PCS-Black)
- ✨【Efficient Tool Organization (3D-Clear Identification)】These 3D-printed magnetic toolbox labels let you instantly identify the contents of every tool box drawer—no more squinting or rummaging through clutter! Covering categories like woodworking, automotive repair, and gardening tools, these tool box labels streamline your tool management and cut down on time-wasting searches for good.
- ✨【Ultra-Strong Magnetic Adhesion】Equipped with strong magnets, these magnetic tool box labels adhere firmly to metal tool boxes, carts, cabinets, and racks. They peel off cleanly without leaving sticky residue, so you can reposition or rearrange these tool box labels easily as your tool collection expands or shifts.
- ✨【Durable, Waterproof & 3D-Readable】Crafted from heavy-duty, wear-resistant material, these magnetic toolbox labels resist oil, dust, and workshop abrasion—and they’re fully waterproof, so spills or cleaning won’t fade the print. The 3D raised letters and high-contrast design of these tool box labels ensure sharp readability, even in dimly lit garages or workshops.

Magnetic Tool Box Labels, Reusable Heavy Duty Magnetic Toolbox Labels for Garage, Workshop, Storage Bins, 12 Pcs/Red Red Regular Thickness 12
- STRONG MAGNETIC ADHESION – These magnetic toolbox labels feature a high-quality magnetic backing that firmly adheres to any ferromagnetic surface (like steel toolbox es, cabinets, or shelves). Whether used as magnetic toolbox drawer labels or magnet tool box labels, they stay in place during transportation—no slipping, even with heavy toolbox accessories nearby.
- CLEAR & EASY-TO-READ – Featuring premium ink and high-resolution printing technology, every character on these magnetic toolbox drawer labels is sharp, bold, and easy to read at a glance—no squinting required. The optimized font size and clear contrast ensure excellent visibility even in low-light workshop environments or from a distance, helping you quickly identify tools, parts, or compartments without wasting time.
- DURABLE & LONG-LASTING – Made with thick, tear-resistant soft magnetic material, these magnetic toolbox labels are built to withstand the harshest workshop conditions. Magnetic tool box labels resist smudges, oil stains, dust, and water splashes, while the fade-proof printing ensures the text remains clear and legible for years—even with daily exposure to wear and tear.

12 Pack of Magnetic Tool Box Labels,3D-Printed Toolbox Labels,Reusable Tags, General Tool Box Organize Accessories for Steel Toolboxes, Carts, Drawers, and Cabinets (Black)
- Efficient Organization: Our magnetic toolbox labels help you quickly identify the contents of each drawer, streamlining your tool management process.Say goodbye to confusion when searching for tools!
- Strong Magnetic Attachment: Featuring powerful magnets, these tool box labels adhere securely to metal toolboxes, cabinets, and racks. They’re easy to attach and remove without leaving residue, allowing for effortless repositioning as your tools evolve.
- Durable and Reusable: Crafted from wear-resistant material, these labels resist oil, dust and daily wear. 3D raised letters and high-contrast colors ensure readability even in dim lighting.