
Organizing Router Bits: 5 Easy Methods

Table of Contents
- The Importance of Proper Router Bit Storage
- Method 1: The Custom Wood Block System
- Method 2: High-Density Foam Inserts
- Method 3: Wall-Mounted Racks for High Visibility
- Method 4: Dedicated Router Table Drawers
- Method 5: Modular Commercial Trays and Cases
- Pro Tips for Maintaining Your Router Bits
- Frequently Asked Questions
The Importance of Proper Router Bit Storage
If you have ever spent ten minutes digging through a cluttered drawer only to find your favorite flush-trim bit has a chipped carbide edge, you know the frustration of poor organization. Router bits are among the most precise and expensive cutting tools in a woodworker's arsenal. Unlike a standard drill bit, a router bit’s cutting edge is incredibly brittle; even a small bump against another steel tool can cause micro-fractures that result in "chatter" or burn marks on your expensive hardwood workpieces.
Effective router bit storage is about three primary goals: protection, accessibility, and inventory management. When your bits are stored properly, the sharp edges never touch one another, and they are shielded from the moisture and dust that can lead to corrosion. Furthermore, a well-organized system allows you to see exactly what you have at a glance, preventing the "double-buy" mistake where you purchase a new bit simply because you couldn't find the one you already owned.
In this guide, we will explore five distinct methods for organizing your collection, ranging from DIY shop-made solutions to professional-grade modular systems. Whether you have a modest collection of five bits or a massive library of specialized profiles, one of these methods will transform your workflow and protect your investment for years to come.
Method 1: The Custom Wood Block System
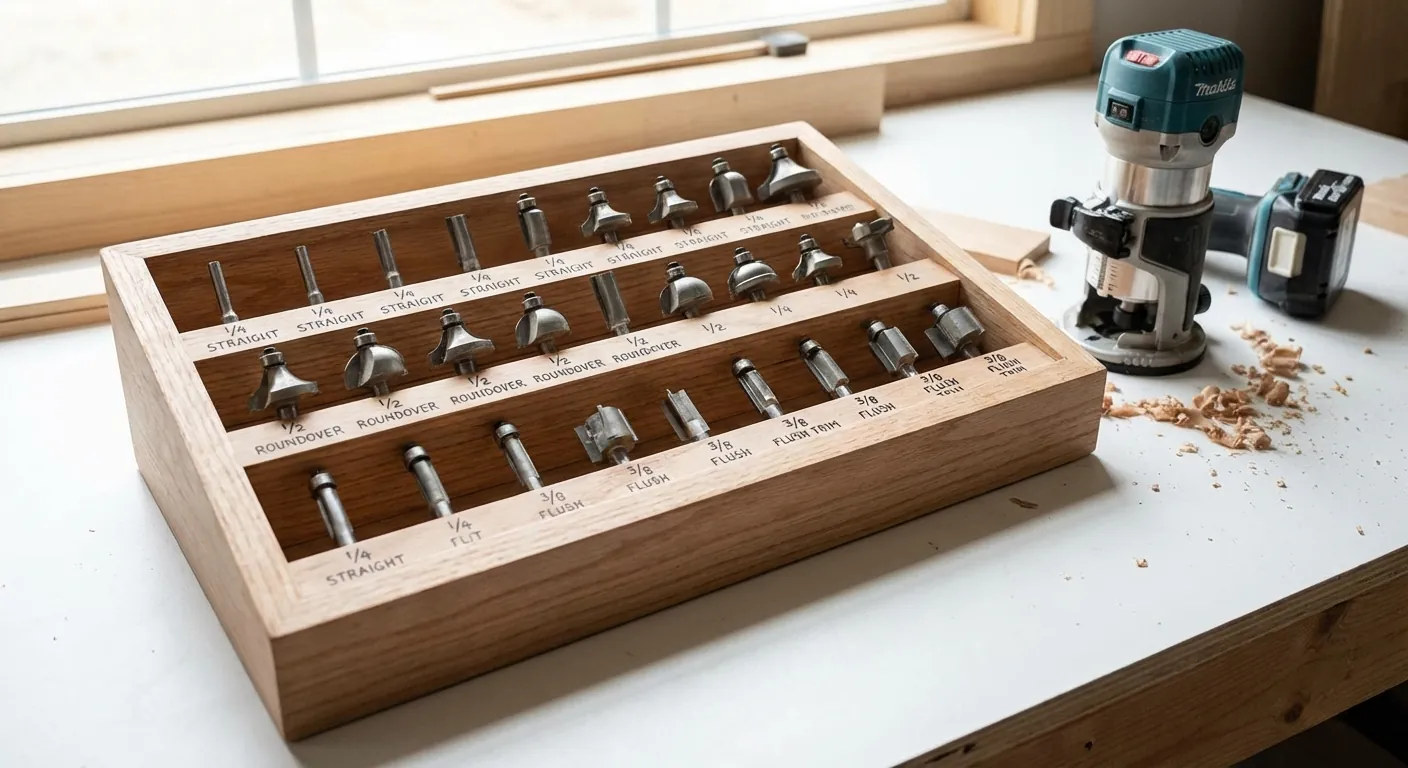
The custom wood block is the quintessential DIY solution for router bit storage. It is cost-effective, highly customizable, and can be built entirely from workshop scraps. The core concept involves drilling a series of holes into a thick piece of hardwood—usually 1.5 to 2 inches thick—to hold the shanks of your bits. By using a scrap of maple or oak, you ensure the block is heavy enough to remain stable and won't easily tip over when you reach for a heavy 1/2-inch shank raised panel bit.
Designing for Different Shank Sizes
When building your own block, you must account for both 1/4-inch and 1/2-inch shanks. A common mistake is drilling the holes exactly the size of the shank, which can make the bits difficult to remove if the wood expands slightly due to humidity. Instead, use a 17/64-inch drill bit for your 1/4-inch shanks and a 33/64-inch bit for your 1/2-inch shanks. This extra 64th of an inch provides just enough "slop" to allow the bits to slide in and out smoothly without wobbling.
Spacing and Layout Considerations
Spacing is the most critical factor in a custom block. You need to ensure there is enough room between the holes so that the large diameters of your profiling bits (like chamfer or cove bits) don't touch their neighbors. A good rule of thumb is to space the centers of your holes at least 1.5 to 2 inches apart. This spacing also provides enough "finger room" to safely grasp the shank or the non-cutting part of the bit without slicing your hand on the adjacent cutters.
Method 2: High-Density Foam Inserts
For woodworkers who prefer a softer touch or need a mobile solution, high-density foam (often called Kaizen foam or EVA foam) is an excellent choice. This method involves using a thick sheet of foam that can be cut to fit perfectly inside a tool chest drawer or a dedicated carrying case. The foam provides a snug, cushioned fit that absorbs vibration and prevents the bits from shifting during transport, making it the gold standard for contractors or those who take their tools to job sites.
{{PRODUCT_CARD:B0000224S9}}
I highly recommend high-density foam inserts like the Peachtree Woodworking Foam because they offer a level of impact protection that hard wood or plastic simply cannot match. If you accidentally drop a foam tray, your bits are far more likely to remain seated and undamaged. This system is best for woodworkers who have a growing collection and want a clean, professional look that can be easily expanded by simply cutting more holes in a new sheet of foam.
The standout feature of this specific foam is its density; it is firm enough to hold a heavy 1/2" shank bit upright without sagging, yet soft enough to allow for easy insertion. One drawback is that foam can occasionally trap moisture if stored in a very humid environment, so it is vital to ensure your bits are dry and lightly oiled before placing them in the foam. Compared to wooden blocks, foam is much faster to "build"—you can set up a whole drawer in under twenty minutes using a simple layout tool.
{{/PRODUCT_CARD}}
Customizing Foam Layouts
To get the most out of a foam system, use a hollow punch or a specialized foam drill bit to create perfectly clean holes. You can even use a multi-layered approach where you cut out the silhouette of the bit's profile so it can lay flat, though most woodworkers prefer the vertical "hole-only" method to save space. Labeling foam can be done with a silver permanent marker, allowing you to write the bit type and size directly next to the hole for instant identification.
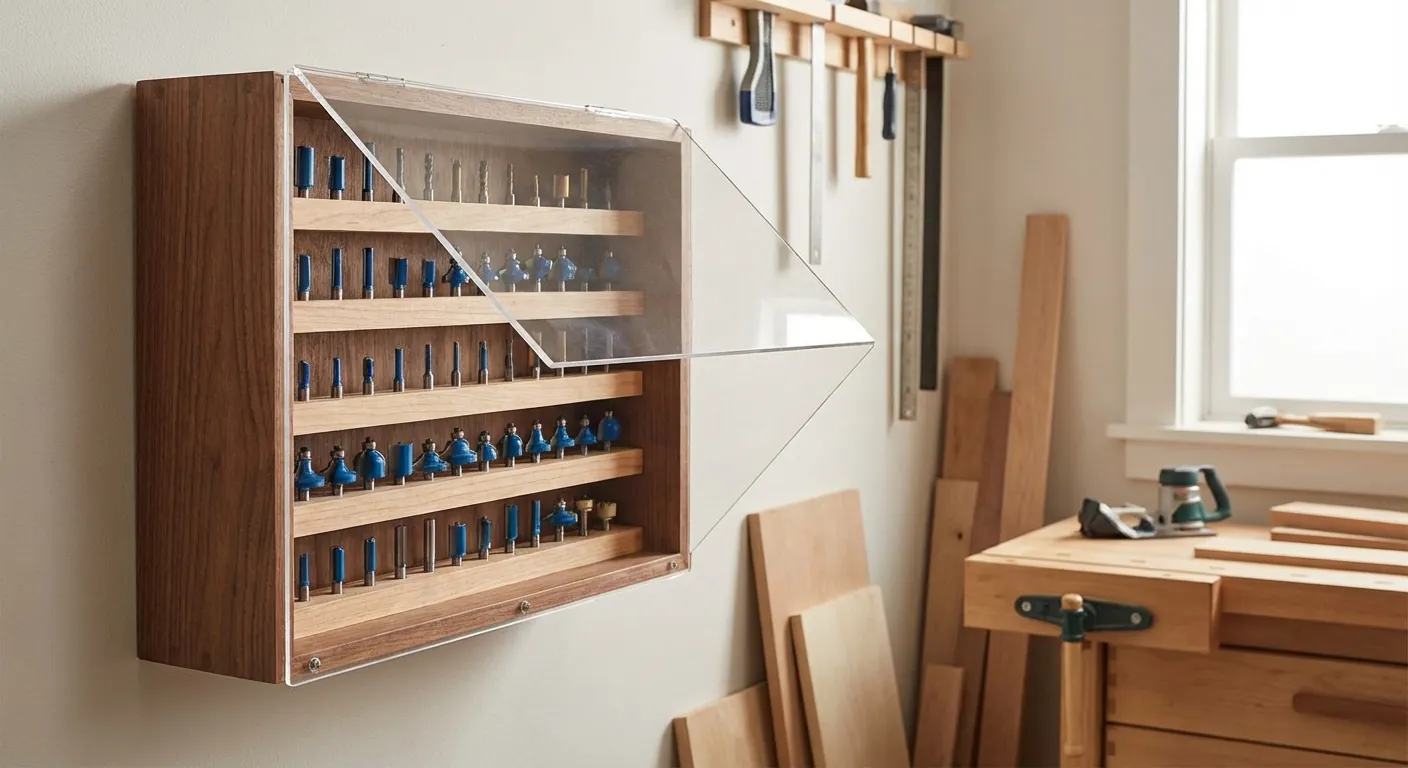
Method 3: Wall-Mounted Racks for High Visibility
If floor and drawer space are at a premium in your workshop, moving your router bit storage to the wall is a game-changer. Wall-mounted racks keep your bits at eye level, making it incredibly easy to find the exact profile you need while you are standing at the router table. This method also keeps the bits away from the dust and debris that tends to accumulate in lower drawers, potentially extending the life of the bearings on your bits.
The Angled Shelf Design
One of the most effective wall-mounted designs is the angled shelf. By mounting your bit-holding strips at a 15 to 30-degree upward angle, you make the labels and the bit profiles much easier to see from a standing position. This also prevents the bits from accidentally vibrating out of their holes if the rack is mounted near a heavy machine. You can easily integrate this into a French Cleat system, allowing you to move the entire rack closer to your project when needed.
Protecting Against Dust and Grime
While wall storage offers great visibility, it does expose your bits to airborne sawdust. To mitigate this, many expert woodworkers build their wall racks with a clear acrylic or Lexan "flip-up" cover. This allows you to see your inventory while keeping the bits clean. Additionally, a wall rack should be placed away from any windows or exterior doors where temperature swings could cause condensation on the cold metal of the bits, which is a leading cause of surface rust.
Method 4: Dedicated Router Table Drawers
For the ultimate in efficiency, many woodworkers choose to integrate their router bit storage directly into the cabinet of their router table. This "point-of-use" storage ensures that every accessory you need—from the bits to the collet wrenches and height gauges—is within arm's reach. By building a series of shallow drawers specifically for bits, you can categorize them by type: one drawer for straight bits, one for edge-forming bits, and another for joinery bits.
{{PRODUCT_CARD:B001DT1560}}
The Rockler Router Bit Storage Tray is my top recommendation for anyone building a dedicated router table cabinet. It is best for the organized woodworker who wants a "plug-and-play" solution without the hassle of drilling dozens of holes. This tray features a grid of holes that can accept both 1/4" and 1/2" shanks through the use of interchangeable inserts, which is a massive advantage over fixed-hole wooden blocks.
The standout feature is the modularity; you can rearrange the bit positions as your collection changes. The heavy-duty plastic construction is also resistant to the oils and cleaners used on bits, which can sometimes degrade foam or stain wood. The only real drawback is that the tray has a fixed footprint, so you must ensure your drawer is large enough to accommodate it. Compared to DIY blocks, this tray offers a much cleaner, more uniform look that professional shops prefer.
{{/PRODUCT_CARD}}
Managing Vibration in Drawers
Because router tables generate significant vibration during operation, it is important that your drawer storage is secure. If your bits are loosely held, the vibration can cause them to rattle together. Using rubberized inserts or the aforementioned Rockler trays ensures that the bits stay put even when you are hogging out deep mortises. Adding a layer of non-slip drawer liner beneath your storage trays can further dampen vibration and keep the trays from sliding around when you open and close the drawer.
Method 5: Modular Commercial Trays and Cases
For those who value flexibility above all else, modular commercial systems offer the ability to grow your storage alongside your tool collection. These systems often consist of individual plastic "bushings" or "bit holders" that can be snapped into a base rail or a specialized carrying case. This is an ideal solution for woodworkers who might start with a small kit but plan to add specialized bits for cabinetry or furniture making over time.
The Benefit of Interchangeable Bushings
The primary advantage of modular systems is the use of interchangeable bushings. These small plastic inserts allow a single storage hole to hold either a 1/4-inch or 1/2-inch shank perfectly. This eliminates the "dead space" problem where you have empty 1/2-inch holes but no room for your 1/4-inch bits. As your needs change, you simply swap the bushing rather than rebuilding your entire storage rack.
Portability and Protection
Many modular systems come with dedicated hardshell cases. If you frequently move your tools between a home shop and a secondary location, a hardshell case with modular inserts provides the highest level of protection. These cases often include specialized slots for peripheral items like extra bearings, Allen wrenches, and shim kits for stackable dado or rail-and-stile bits. Keeping these small parts with their respective bits is a hallmark of an organized and efficient workshop.
| Storage Method | Best For | Capacity | Portability |
|---|---|---|---|
| Custom Wood Block | DIY Enthusiasts | High (Customizable) | Low |
| Foam Inserts | Mobile Woodworkers | Medium | High |
| Rockler Storage Tray | Router Table Integration | High | Medium |
| Wall-Mounted Rack | Small Workshops | Medium | None |
| Modular Cases | Specialized Bit Sets | Low to Medium | Very High |
Pro Tips for Maintaining Your Router Bits
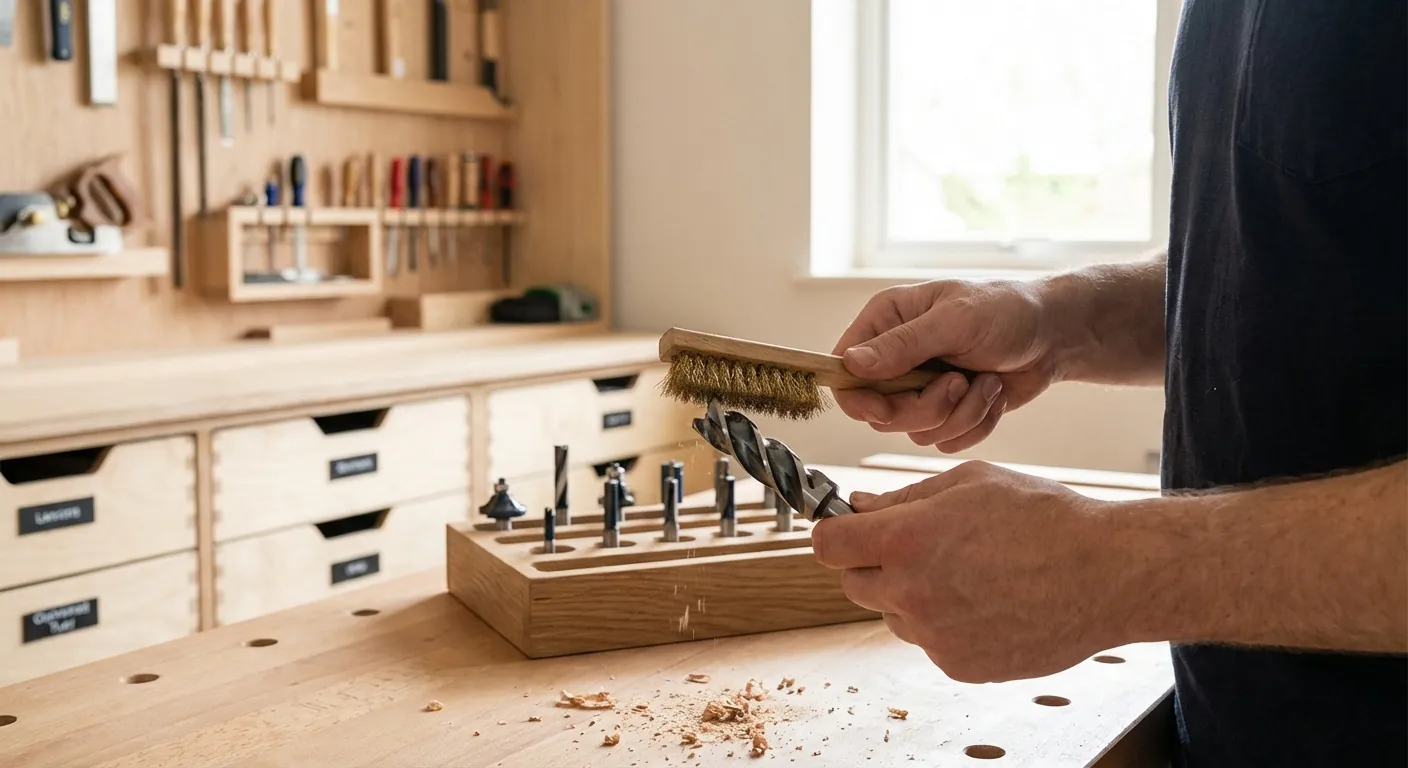
Organization is only half the battle; maintaining the bits while they are in storage is equally important. Before you put any bit back into its designated spot, you should inspect it for pitch and resin buildup. Pine, cherry, and other resinous woods leave a sticky residue on the carbide that can bake on during use, leading to heat buildup and premature dulling. A quick spray of a dedicated bit cleaner and a wipe with a brass brush will keep your bits performing like new.
Another expert tip is to use a dry lubricant or a thin coat of "tool guard" oil on the shanks before storage. This is especially important for 1/2-inch shanks, which have more surface area prone to rust. A rusted shank can become stuck in your router's collet, leading to a dangerous situation or damaging the router itself. By keeping the shanks clean and lightly lubricated, you ensure they slide in and out of both the storage system and the router collet with ease.
Finally, always store your bits with the bearings in mind. If you use a liquid cleaner, be careful not to soak the shielded bearings, as the cleaner can strip the internal grease. After cleaning the bit, a single drop of high-speed bearing oil can extend the life of the bearing significantly. Store the bits vertically whenever possible to prevent any side-loading on the bearings and to ensure that the heavy carbide heads aren't putting unnecessary pressure on the storage medium.
Frequently Asked Questions
What is the best way to label router bits in a storage system?
The most effective way to label router bits is by using a combination of size and profile type. For wooden blocks or foam inserts, a fine-point permanent marker or a label maker works well. You should label the shank size (1/4" or 1/2") and the specific profile name, such as "1/2" Roundover" or "45° Chamfer." Some woodworkers also find it helpful to include the maximum RPM rating on the label, especially for large diameter bits that must be run at slower speeds for safety.
In addition to physical labels, keeping a "bit log" or a digital photo of your organized tray can help you quickly identify if a bit is missing. If you have a large collection, color-coding your labels based on the bit's function (e.g., green for joinery, red for edge-forming) can further speed up your workflow. This systematic approach ensures that even if you haven't used a specific bit in months, you will know exactly what it is and how to use it safely the moment you pull it from the rack.
Can I store router bits horizontally in a drawer?
While you can store router bits horizontally, it is generally not recommended unless they are in a dedicated "fitted" case or foam cutout. When bits lay flat and loose in a drawer, they can roll into each other, causing the carbide edges to chip. Carbide is extremely hard but also very brittle; a light impact between two bits can ruin the cutting edge of both. If you must store them horizontally, ensure each bit has its own dedicated, snug-fitting slot where it cannot move.
Horizontal storage also makes it harder to identify the bit profiles at a glance. When bits are stored vertically, the profile is usually visible from the top or side, and the shank is safely tucked away. If you are short on vertical clearance in a drawer, consider an angled storage rack (about 15-20 degrees) which offers a compromise between height savings and the protection/visibility of vertical storage.
How do I prevent rust on my router bits while they are in storage?
Rust is the enemy of precision tools, and router bits are particularly susceptible because they are often handled with bare hands, leaving behind oils and moisture. To prevent rust, always wipe down the shanks with a clean cloth after use. Applying a specialized tool protectant or a dry PTFE-based lubricant creates a barrier against moisture without leaving a sticky residue that would attract sawdust once the bit is back in use.
Additionally, consider the environment of your storage. If your workshop is in a garage or basement with high humidity, adding silica gel desiccant packs to your router bit drawers or cases can help absorb excess moisture. Some woodworkers even use "VCI" (Vapor Corrosion Inhibitor) liners in their tool drawers, which release a harmless vapor that prevents oxidation on metal surfaces. Keeping your bits clean, dry, and shielded from the air is the best recipe for a rust-free collection.
Should I keep the original plastic packaging for my router bits?
While the original plastic "clamshell" or "tube" packaging is excellent for shipping, it is often cumbersome for daily workshop use. These packages can be difficult to open and take up significantly more space than a consolidated storage tray. However, for very expensive or rarely used bits—such as a large multi-piece crown molding set—keeping the original padded case is often wise as it provides the maximum level of protection and keeps all related components together.
For your "everyday" bits, it is usually better to transition them into one of the five methods mentioned in this article. If you do decide to discard the packaging, make sure to transfer any pertinent information, such as the manufacturer's recommended RPM settings or the replacement bearing part number, to your new storage system. You might also clip the brand name from the packaging and tape it near the bit's new home so you know where to go for a replacement when it eventually wears out.
How much space should I leave between router bits?
The amount of space you should leave depends entirely on the diameter of the bits in your collection. For a standard set of straight and small edge-forming bits, a 1.5-inch center-to-center spacing is usually sufficient. However, if you have large bits, such as raised panel bits or large cove bits which can exceed 3 inches in diameter, you will need to adjust your spacing accordingly. The goal is to ensure that the widest part of the bit has at least 1/2-inch of clearance from any neighboring bit.
Beyond just protecting the carbide, proper spacing is a matter of safety. If bits are crowded too closely together, you risk cutting your fingers when reaching for a bit in the middle of the pack. Leaving enough "finger room" allows you to safely grasp the bit by the shank or the top of the pilot bearing. If you are using a modular tray, you can easily skip a hole to accommodate larger bits, which is why modularity is so highly valued in workshop organization.
Our Top Picks for 2026
We've spent hours researching and testing to find the absolute best options currently available.

POWERTEC Router Bit Storage Inserts for 110 Bits, 50PCS 1/2" and 60PCS 1/4" Shank Router Bits, Routers Bit Holder, Bits Organizer with High Density Foam, Fits Toolbox, Drawer, Workstation (71046) Router bit tray, 110 Holes Router Bit Storage
- 110 ROUTER BITS STORAGE: This premium high capacity router bit holder tray holds 50 PCS 1/2" and 60 PCS 1/4" shank router bits and keeps your bits neatly arranged plus easily accessible for any project. (router bits not included, just for display)
- DURABLE HIGH DENSITY FOAM: Built from thick, high-density foam padding, this tray protects against wear and tear, providing long-lasting durability for your tools. This helps prevent scratches and maintains the quality of your tools for longer use.
- VERSATILE & CUSTOMIZABLE: Our router bit storage tray can easily be labeled and cut to fit into toolboxes, drawers, workstations, cabinets and integrate seamlessly into your woodworking projects. Size: 12-13/16” Long x 10-13/16” Wide x 1-5/16” Thick

POWERTEC Router Bit Storage Tray, Router Bit Holder - Holds 50 Bits: (30) 1/2" and (20) 1/4" Shank Router Bits, Drill Bit Organizer Tray, High Density Foam Tool Box - Router Bits Not Included (71217) Router Bit Tray, 50 Bits Storage Router Bit Storage
- STORAGE CAPACITY: Accommodates up to 50 router bits, with designated slots for (30) 1/2-inch shank bits and (20) 1/4-inch shank bits, ensuring efficient organization. Includes (1) Foam Router Bit Storage Tray (router bits not included)
- DURABLE HIGH DENSITY FOAM: Crafted from thick, high-density foam padding, this tray offers long-lasting durability and strong protection for your tools. This helps prevent scratches and maintains the quality of your tools for longer use.
- VERSATILE COMPATIBILITY: The router bit organizer can be easily cut to fit various toolboxes, drawers, or storage systems, offering flexible organization for quick and easy access to your bit set. Dimensions: 12” Long x 6” Wide x 1-5/16” Thick

POWERTEC Router Bit Tray Organizer - Holds 110 Bits Each Tray | 50 1/2" and 60 1/4" Shank Router Bit Holder for Tool Box and Drawer Storage Solution, 2PK (71046-P2) 2PK, 110 PCs Router Bits Storage Router Bit Storage
- INCLUDES: (2) Foam Router Bit Storage Tray (router bits not included)
- FUNCTION: Specifically designed for seamless bit storage, this foam bit tray enables you to organize and secure up to 110 bits
- COMPATIBILITY: Accommodates (50) ½-inch shank router bits and (60) ¼-inch shank router bits – Size: 12-13/16” Long x 10-13/16” Wide x 1-5/16” Thick