
Small Shop Layout & Design Masterclass

Table of Contents
- The Philosophy of the Small Shop Layout
- The Workflow Triangle: Designing for Movement
- Mobile Machinery: The Small Shop Superpower
- Maximizing Vertical Real Estate
- The Multi-Functional Workbench Hub
- Dust Collection Strategies for Tight Quarters
- Electrical and Lighting: The Foundation of Safety
- Zoning Your Shop: From Lumber to Finish
- Common Layout Mistakes to Avoid
- Frequently Asked Questions
The Philosophy of the Small Shop Layout
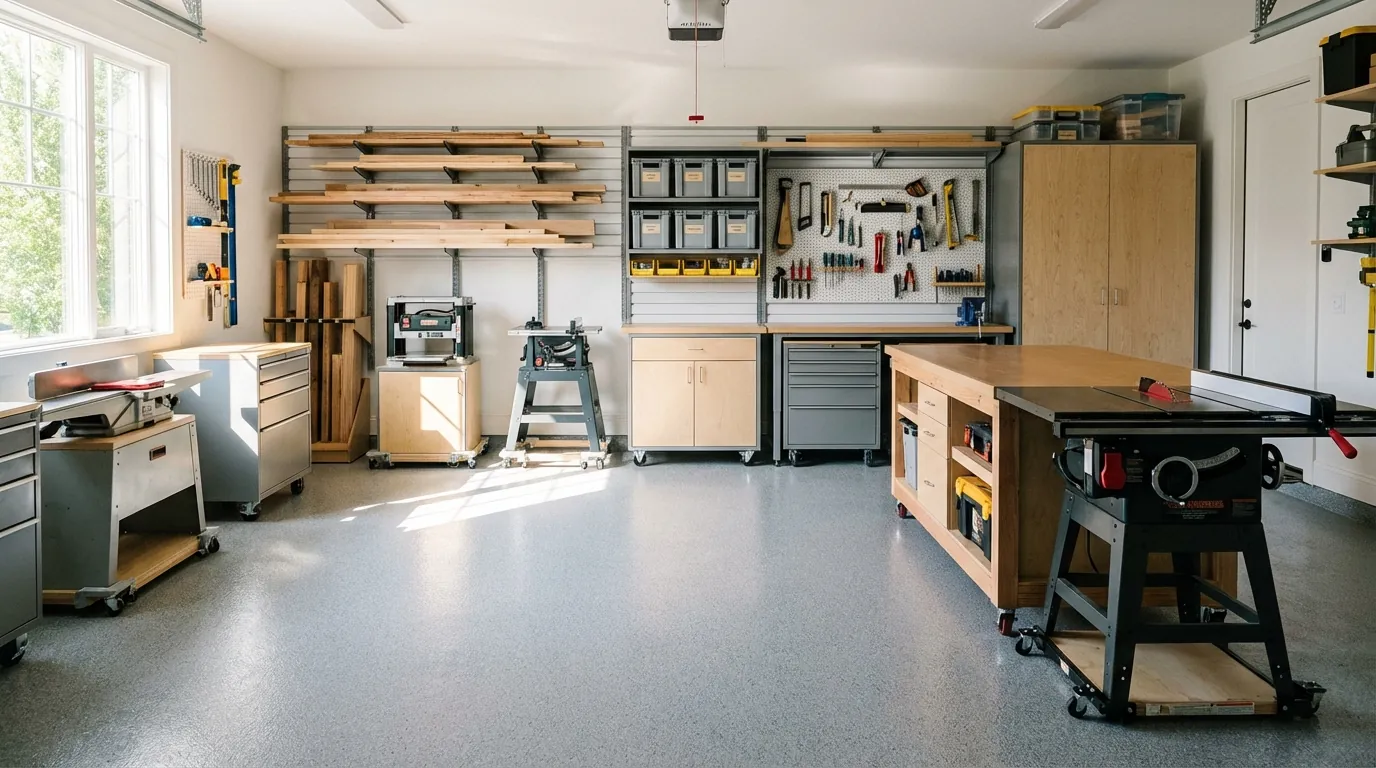
Designing a small woodworking shop is less about finding space and more about managing constraints. In a large commercial space, you have the luxury of "dead space"—areas where you can walk around machines without a second thought. In a small shop, every square inch must justify its existence. The primary goal of a masterclass-level layout is to eliminate "friction." Friction is anything that slows you down: moving three boxes to get to your planer, tripping over an extension cord, or having to clear your workbench just to use your miter saw. When we talk about workshop layout ideas, we are really talking about the physics of movement and the economy of motion.
A successful small shop layout relies on the concept of "nested utility." This means that tools and workstations should serve multiple purposes or be able to occupy the same physical footprint at different times. For example, your table saw outfeed table shouldn't just be a flat surface; it should be your primary assembly table, a glue-up station, and perhaps even a housing for your vacuum system. By layering these functions, you effectively double or triple your usable square footage. This requires a shift in mindset from "where does this tool go?" to "how does this tool interact with the rest of the shop?"
Finally, consider the psychological impact of your layout. A cluttered, cramped shop leads to "decision fatigue" and safety lapses. If you feel claustrophobic, you won't want to spend time there, and your craft will suffer. A well-designed layout incorporates "visual breathing room." This might mean keeping the center of the floor clear or ensuring that your most-used tools are at eye level and easily accessible. By prioritizing flow over storage, you create an environment where creativity can thrive despite the physical boundaries of the four walls around you.
The Workflow Triangle: Designing for Movement
In kitchen design, architects use the "Work Triangle" (sink, stove, refrigerator) to ensure efficiency. In woodworking, we have our own version: the Breakout Zone, the Processing Zone, and the Assembly Zone. The Breakout Zone is where long boards are cut into manageable pieces (usually the miter saw or a circular saw station). The Processing Zone is where those pieces are squared and dimensioned (table saw, jointer, planer). The Assembly Zone is where the project finally comes together. In a small shop, these zones often overlap, but their logical sequence must remain intact to prevent you from carrying heavy lumber back and forth across the room.
Efficiency in a small shop is often measured in "steps taken." If your lumber rack is in the far back corner and your miter saw is by the door, you are wasting energy every time you start a project. A master-level layout places the lumber storage immediately adjacent to the first point of contact—the miter saw. From there, the material should move in a "U" or "L" shaped path toward the table saw and then to the workbench. This linear progression ensures that you aren't constantly dodging half-finished projects or tripping over offcuts while trying to reach your next tool.
Furthermore, you must account for the "swing" and "clearance" of your materials. A 10-inch table saw requires at least 8 feet of clearance both in front and behind it to rip a standard 8-foot board. In a small shop, you rarely have 16 feet of straight-line space. The solution is to align your machine's "path of travel" with doorways or windows. By positioning your table saw so that long rips can extend through an open garage door or into an adjacent laundry room, you effectively "borrow" space from the outside world, allowing a small shop to handle large-scale projects.
Mobile Machinery: The Small Shop Superpower
The single most important rule for any shop under 400 square feet is this: If it doesn't have wheels, it doesn't belong. Fixed machinery is the death of flexibility. When your jointer, planer, and band saw are on high-quality mobile bases, your shop becomes a modular environment that can be reconfigured in seconds. This allows you to "center-stage" the specific tool you need for a task while tucking the others against the wall. This "Tetris" approach to shop management is what separates a frustrating workspace from a professional-grade studio.
{{PRODUCT_CARD:B0000224R6}}
I highly recommend the HTC-2000 Universal Mobile Base for anyone struggling with a cramped shop layout. In a small space, the ability to shift a 300-pound bandsaw with one foot is a game-changer. This base is specifically designed for those who have a variety of machine footprints, as it is fully adjustable in size. I recommend it because it strikes the perfect balance between affordability and heavy-duty performance, supporting up to 400 lbs without breaking a sweat.
This is best for the hobbyist who is slowly upgrading their shop and doesn't want to buy a custom base for every single tool. The standout feature is the side-profile design, which keeps the machine low to the ground, maintaining your tool's original working height—a critical factor for ergonomic safety. One drawback to consider is that on very uneven shop floors, the smaller wheels can occasionally catch on debris. Compared to "fixed-size" bases, this offers much more long-term value as your tool collection evolves.
{{/PRODUCT_CARD}}
Beyond just moving tools out of the way, mobile bases allow for "tandem tool usage." For instance, you can height-match your planer and your jointer so that the outfeed of one serves as the infeed support for the other. When space is at a premium, tools shouldn't just be mobile; they should be collaborative. This requires careful measurement of your shop floor's levelness and the height of your mobile bases, but the payoff is a seamless workflow where your machines work together rather than competing for space.
Maximizing Vertical Real Estate
When you run out of floor space, look up. Most shops have 8 to 10 feet of vertical space, yet most woodworkers only use the bottom 3 feet. Vertical storage is about more than just putting up shelves; it's about creating a "system of access." Frequently used items—like your favorite chisels, squares, and safety gear—should be in the "strike zone" (between your waist and shoulders). Less frequently used items, like specialty jigs or seasonal supplies, should be stored near the ceiling or under workbenches.
The French Cleat system is the gold standard for small shop organization. Unlike pegboard, which can be flimsy and limiting, French cleats allow you to create custom tool holders that can be moved and rearranged as your needs change. This adaptability is crucial because as you gain skills, your tool kit will grow. If your storage is static, your shop will eventually become cluttered. With a cleat system, you can "re-skin" your walls every few months to optimize for whatever project is currently on your bench.
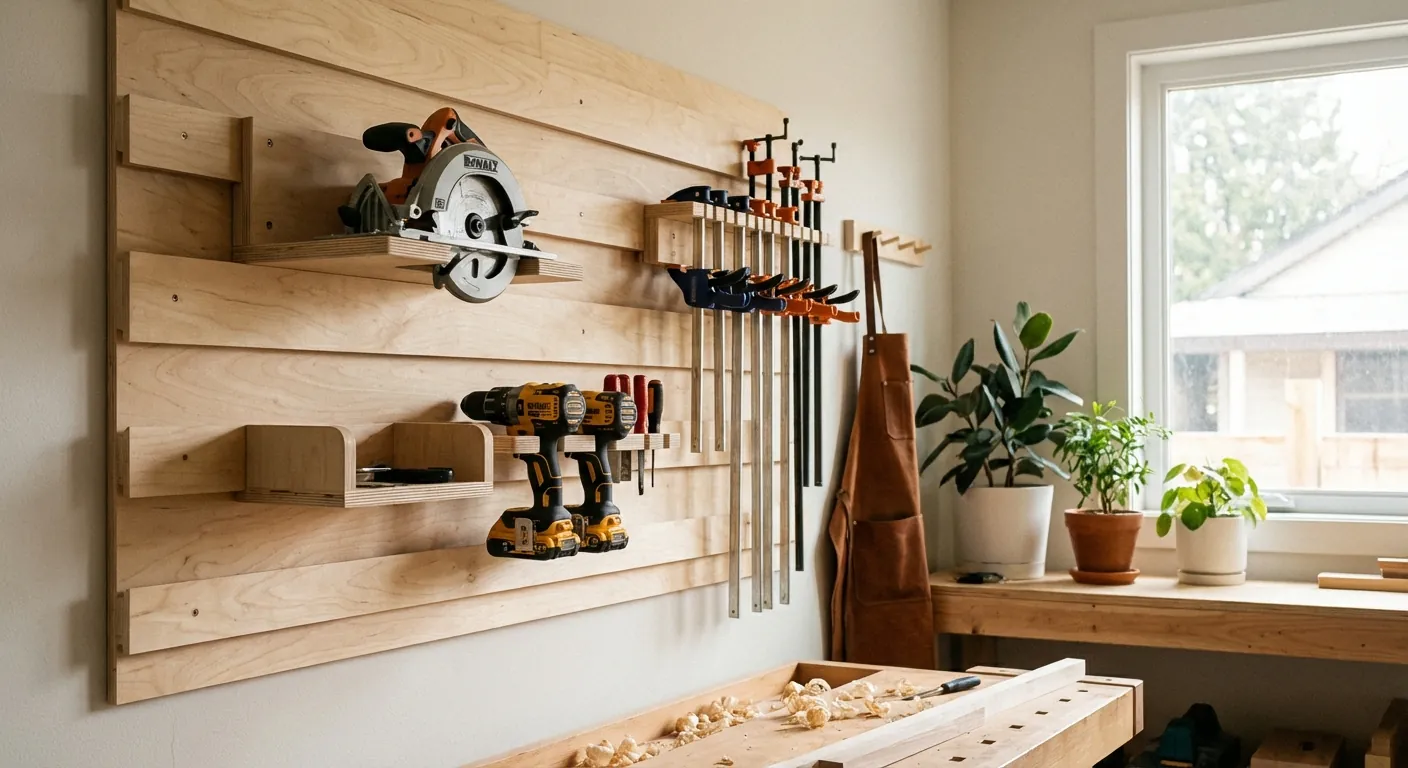
Don't forget the space under things. The cavity beneath a table saw wing or a miter saw station is prime real estate for drawer stacks. In a small shop, open shelving is your enemy because it collects sawdust and looks cluttered. Deep, full-extension drawers allow you to maximize the footprint of your machines while keeping your shop looking clean and professional. Remember: if you can see the floor, the shop feels bigger. By moving everything into wall-mounted or under-tool storage, you maintain that crucial "visual breathing room."
The Multi-Functional Workbench Hub
In a small shop, the workbench is the sun around which all other tools orbit. It is rarely just a place for hand-tool joinery. It must serve as an assembly table, a sanding station, a clamping center, and often an outfeed table for the table saw. To achieve this, the height of the workbench is the most critical dimension in your shop layout. It must be exactly 1/8" lower than your table saw's miter slots to allow workpieces to slide over it without catching, but high enough to prevent back strain during long assembly sessions.
{{PRODUCT_CARD:B001DT3316}}
The Sjöbergs Scandi Plus 1425 is my top recommendation for woodworkers who need a professional-grade hub in a compact footprint. This bench is best for the serious enthusiast who values stability and precision joinery. What makes it stand out is the dual-vise system and the massive European beech construction, which provides the mass needed to prevent the bench from "walking" across the floor during heavy planing.
The standout feature is the pre-drilled dog hole pattern, which allows for an infinite variety of clamping configurations—essential when you don't have room for a dedicated clamping table. The main drawback is the price; it is a significant investment. However, compared to DIY plywood benches, the Scandi Plus offers a level of flatness and rigidity that is hard to replicate. It turns a small corner of your garage into a legitimate cabinet shop.
{{/PRODUCT_CARD}}
To truly master the workbench hub, you should integrate "utility ports" directly into the bench. This includes built-in power strips, recessed T-track for hold-downs, and even a vacuum port for localized dust collection. By making the workbench self-contained, you reduce the number of cords trailing across the floor. In a small shop, "cord creep" is a major safety hazard. A centralized hub keeps the workflow contained and the floor clear for movement.
Dust Collection Strategies for Tight Quarters
Dust collection is often an afterthought in small shops, but it should be a primary layout consideration. In a confined space, fine particulate matter (PM2.5) reaches dangerous concentrations much faster than in a large barn. A standard shop vac is not enough for a table saw or planer; you need a dedicated dust collector. However, large 2-stage cyclones take up a massive amount of floor space. The solution for the small shop is a "hybrid" approach: a wall-mounted collector with a high-efficiency separator.
{{PRODUCT_CARD:B00270V8S6}}
I recommend the WEN DC1300 13-Amp 1300 CFM Dust Collector for small shop layouts. It provides the high CFM (Cubic Feet per Minute) necessary to pull chips from larger machines like planers, but it has a relatively small footprint. This is best for the garage woodworker who needs more power than a shop vac but doesn't have room for a 5-foot-wide cyclone system.
The standout feature is the 50-gallon collection bag and the mobile base, which allows you to roll the collector to whatever machine is currently in use. One drawback is the standard 30-micron bag, which I strongly suggest upgrading to a 1-micron canister filter to protect your lungs in a small space. Compared to stationary units, the WEN’s portability is its greatest asset for layout flexibility.
{{/PRODUCT_CARD}}
To maximize efficiency, use a "drop-down" ducting system rather than running hoses across the floor. Even in a small shop, 4-inch PVC or spiral ducting can be run along the ceiling with vertical drops to each machine. This keeps the floor clear and ensures that you are always just a blast-gate slide away from a clean shop. If permanent ducting isn't an option, use high-quality "flex hose" with quick-connect fittings, but keep the runs as short as possible to maintain suction power.
Electrical and Lighting: The Foundation of Safety
A brilliant shop layout is useless if you are working in shadows or constantly tripping breakers. Most residential garages are wired with a single 15-amp circuit, which is insufficient for running a table saw and a dust collector simultaneously. A masterclass layout includes a dedicated sub-panel with at least two 20-amp circuits for tools and a separate circuit for lighting. This prevents the "dark shop" scenario where a tripped breaker from a heavy rip cut leaves you standing in total darkness with a spinning blade.
Lighting is the most underrated aspect of shop design. Standard overhead "shop lights" often create harsh shadows. In a small shop, you need "layered lighting." This includes high-output LED panels for general illumination, and "task lighting" (like flexible neck lamps) at the drill press, band saw, and workbench. Aim for 5000K "Daylight" color temperature; it reduces eye strain and helps you see the true color of wood and finishes.
When planning your electrical layout, place outlets every 4 to 6 feet along the walls at a height of 42 inches. This is above the height of most workbenches and tool stands, ensuring that you never have to move a heavy machine just to plug it in. If your shop is in the center of a room, consider "ceiling drops" for power. Dropping a retractable cord reel from the ceiling above your workbench provides power exactly where you need it without creating a trip hazard on the floor.
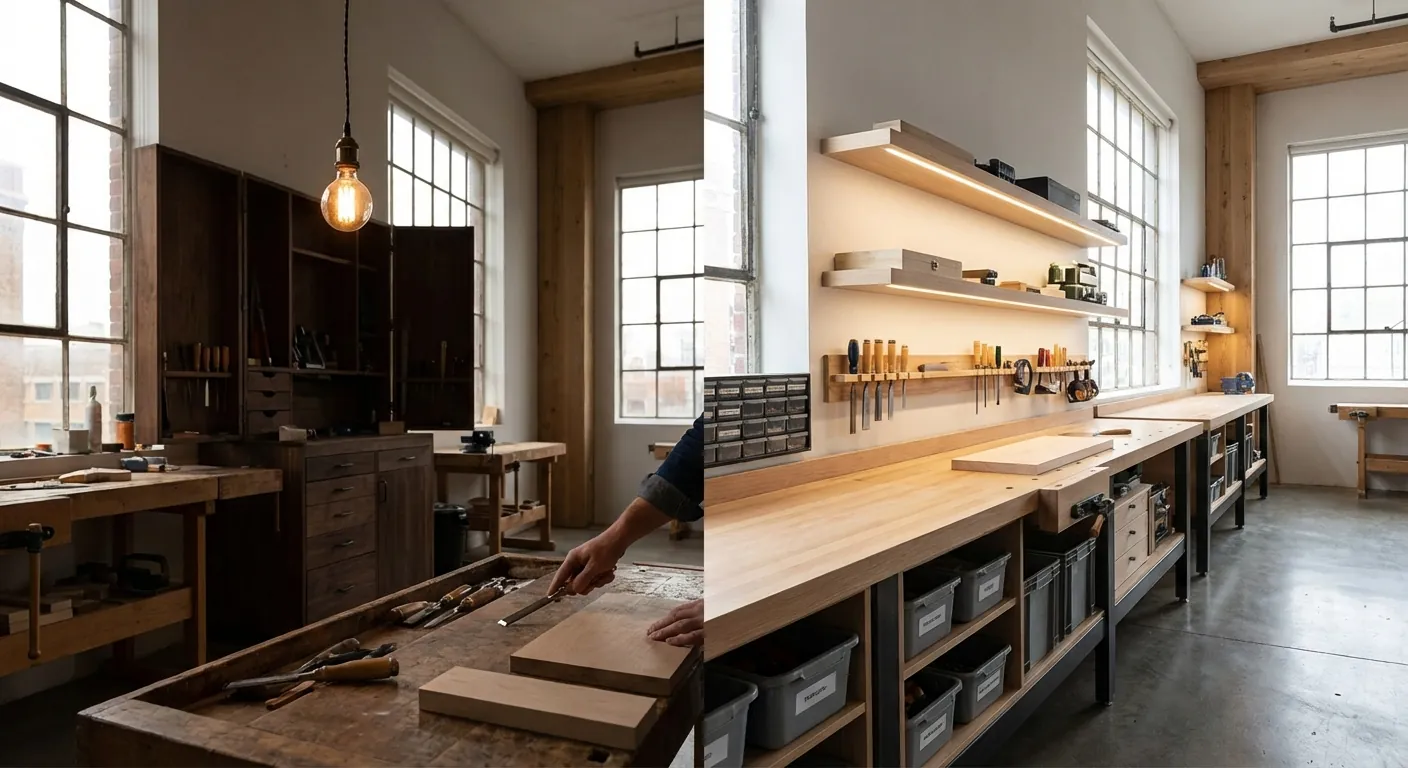
Zoning Your Shop: From Lumber to Finish
Zoning is the process of grouping tools and activities by their "cleanliness" and "noise" levels. Even in a tiny shop, you should try to separate your "Dirty Zone" (sanding, routing, thicknessing) from your "Clean Zone" (finishing, assembly, glue-ups). If you apply finish in the same area where you just sanded a tabletop, you are guaranteed to get nibs in your poly. A simple way to achieve this in a small shop is through the use of retractable curtain walls or even just a well-timed cleaning schedule.
The "Dirty Zone" should be located nearest to your primary dust collection intake and, ideally, near a door or window for cross-ventilation. This is where the bulk of your material removal happens. The "Clean Zone" should be located in the most climate-controlled part of the shop, away from drafts and heavy dust-producing machinery. By mentally (and physically) dividing the shop, you improve the quality of your finishes and reduce the amount of deep-cleaning required between project phases.
Finally, consider a "Media Zone." In the modern woodworking era, many of us use tablets for plans or film our builds for social media. Dedicating a small, dust-protected nook for a laptop or tablet prevents your expensive electronics from being coated in sawdust. This could be as simple as a wall-mounted cabinet with a plexiglass door. Having your plans at eye level, rather than buried under wood scraps on the bench, keeps your mind focused and your workflow organized.
Common Layout Mistakes to Avoid
The most common mistake in small shop design is "Over-Tooling." It is tempting to buy every specialized machine on the market, but in a small shop, a machine that is only used once a year is a liability. Every tool must "pay rent" in the form of frequent use. Before adding a new stationary tool, ask yourself if the task can be performed by a hand tool or a portable power tool that can be stored in a drawer. Often, a high-quality track saw can replace a table saw in a very small shop, saving dozens of square feet.
Another frequent error is ignoring "Infeed and Outfeed" paths. People often measure the footprint of the machine (e.g., 2' x 3') but forget that the machine needs 8 feet of clear space on either side to function. When drawing your layout, always sketch in the "operational envelope" of the tool. If two machines' operational envelopes overlap, that’s fine—as long as you don't need to use them both at the same exact time. This is why "staggering" tool heights is so important; a low jointer can sit in the outfeed path of a higher table saw.
Lastly, don't forget the "Human Factor." We often design for the tools and forget about the person using them. Ensure your main walkways are at least 30 inches wide. If you have to turn sideways to move through your shop, the layout is too cramped. Also, consider ergonomics; placing a frequently used tool too low or too high will lead to fatigue and injury. Your shop should be a place of comfort and joy, not a physical obstacle course that leaves you with a sore back and bruised shins.
Frequently Asked Questions
What is the minimum size for a functional woodworking shop?
While some woodworkers produce incredible work in "closet shops" as small as 50 square feet, the generally accepted minimum for a comfortable hobbyist shop is about 150 to 200 square feet (roughly the size of a one-car garage). At this size, you can fit a table saw, a workbench, and several secondary tools on mobile bases. The key to smaller spaces is prioritizing hand tools or "benchtop" versions of stationary machinery.
In a 200-square-foot space, you must be disciplined about organization. This means utilizing every inch of wall space and ensuring that your central floor area remains clear for assembly. If you go smaller than 100 square feet, you will likely need to move some operations—like large scale ripping or finishing—outdoors or into a driveway when weather permits.
How do I manage lumber storage in a small shop without it taking over?
Lumber is the most difficult thing to store in a small shop because it is bulky and heavy. The best strategy is "Vertical Racking" or "Overhead Racking." Vertical racks allow you to store boards upright against a wall, which makes it easier to see your inventory and pick specific pieces. However, this requires high ceilings. For shops with standard 8-foot ceilings, overhead racks mounted to the joists are the best option for long-term storage of long boards.
Another pro tip is to "store it where you use it." Small offcuts can be stored in bins integrated into the base of your miter saw station. This keeps the small bits handy for jigs and supports while preventing them from cluttering up your main lumber rack. Always remember to cull your scrap pile regularly; if a piece of wood is too small to be useful, it’s just firewood taking up valuable real estate.
Should I choose a stationary table saw or a jobsite saw for a small shop?
This depends on the type of work you do. If you are building large furniture or cabinets, the mass and accuracy of a stationary "contractor" or "cabinet" saw are hard to beat. You can put these on mobile bases to save space. However, if you are strictly a small-craft woodworker or have a very limited footprint, a high-end jobsite saw can be tucked under a workbench when not in use.
The downside of jobsite saws is the noise (universal motors are much louder than induction motors) and the smaller table surface, which can be dangerous when cutting large sheets. A middle-ground solution is a "hybrid" saw, which offers the footprint of a contractor saw with the power and dust collection of a cabinet saw. Whichever you choose, ensure it can be height-matched to your workbench for outfeed support.
How can I keep my shop cool (or warm) in a garage layout?
Temperature control is vital for both your comfort and the health of your wood (which moves with humidity). In a small shop, a "Mini-Split" HVAC system is the gold standard, providing both heating and cooling with a very small footprint. However, these can be expensive. A more budget-friendly approach is a combination of high-quality insulation (don't forget the garage door!) and a portable infrared heater for winter or a high-velocity fan for summer.
Dehumidification is also critical. If your shop is in a basement or a humid climate, a dedicated dehumidifier will prevent your expensive cast-iron tool surfaces from rusting and keep your lumber stable. In a small shop, look for a unit that can be drained via a hose so you don't have to constantly empty a water bucket.
Is a miter saw station necessary in a small shop?
Miter saws are "space hogs" because they require long support wings on both sides. In a very small shop, you might be better off using a crosscut sled on your table saw. However, if you do a lot of "breaking down" of long lumber, a miter saw is a huge time-saver. The best small-shop solution is a "Folding Miter Station" or a "Flip-Top Stand."
A flip-top stand allows you to mount the miter saw on one side and another tool (like a planer) on the other. You simply rotate the top to access the tool you need. This cuts the footprint of two major tools in half. If you do build a permanent miter station, ensure the "wings" are actually storage cabinets or drawers so the space beneath the lumber support isn't wasted.
How do I handle sheet goods (plywood) in a cramped space?
Breaking down 4x8 sheets of plywood is the ultimate challenge for a small shop. The safest and most efficient method is to use a track saw and a piece of rigid foam insulation on the floor. By laying the foam down and cutting the plywood on top of it, you don't need a massive table saw or 16 feet of clearance. Once the sheets are broken down into manageable pieces, you can move to the table saw for final dimensioning.
If you don't have a track saw, many lumber yards will make "breakdown cuts" for a small fee. Having them rip a sheet in half makes it much easier to transport and handle in a small garage. For storage, a "sheet good rack" that holds boards vertically against a wall is the most space-efficient option, though it does require a clear path to "swing" the sheets out when needed.
What is the best flooring for a small woodworking shop?
While most shops start with a concrete garage floor, concrete is hard on your back and even harder on dropped tools (a dropped chisel on concrete is a tragedy). The best upgrade for a small shop is "Interlocking Rubber Tiles" or "Dri-Core" subfloor panels. These provide a layer of cushion and insulation, making long hours at the bench much more comfortable.
If you are on a budget, simply placing "anti-fatigue mats" at your primary workstations (workbench, table saw, lathe) will make a world of difference. Avoid carpet or any porous material that will trap sawdust and become a fire hazard. A smooth, sweepable surface is essential for maintaining the cleanliness required in a high-production small shop.
Our Top Picks for 2026
We've spent hours researching and testing to find the absolute best options currently available.

Create The Ultimate Garage - A Man Cave: For Tools, Projects, Cars and Relaxation
- Top-tier performance in real-world testing
- Premium materials and exceptional build quality
Create The Ultimate Garage - A Man Cave: For Tools, Projects, Cars and Relaxation
- Top-tier performance in real-world testing
- Premium materials and exceptional build quality

Woodworking Project Book: A Woodworking Log Book: Tracker & Record Book For Woodworking Plan or Project, DIY Gift ... Woodworking Lovers | Vintage Brown Cover
- Top-tier performance in real-world testing
- Premium materials and exceptional build quality
Woodworking Project Book: A Woodworking Log Book: Tracker & Record Book For Woodworking Plan or Project, DIY Gift ... Woodworking Lovers | Vintage Brown Cover
- Top-tier performance in real-world testing
- Premium materials and exceptional build quality

Making and Breaking the Grid, Second Edition, Updated and Expanded: A Graphic Design Layout Workshop
- Top-tier performance in real-world testing
- Premium materials and exceptional build quality
Making and Breaking the Grid, Second Edition, Updated and Expanded: A Graphic Design Layout Workshop
- Top-tier performance in real-world testing
- Premium materials and exceptional build quality

The 2-Hour Workshop Blueprint: Design Fast. Deliver Strong. Without Stress.
- Top-tier performance in real-world testing
- Premium materials and exceptional build quality
The 2-Hour Workshop Blueprint: Design Fast. Deliver Strong. Without Stress.
- Top-tier performance in real-world testing
- Premium materials and exceptional build quality

Workshops: Expert Advice for Designing a Great Woodshop in Any Space
- Top-tier performance in real-world testing
- Premium materials and exceptional build quality
Workshops: Expert Advice for Designing a Great Woodshop in Any Space
- Top-tier performance in real-world testing
- Premium materials and exceptional build quality

Making and Breaking the Grid: A Graphic Design Layout Workshop
- Top-tier performance in real-world testing
- Premium materials and exceptional build quality
Making and Breaking the Grid: A Graphic Design Layout Workshop
- Top-tier performance in real-world testing
- Premium materials and exceptional build quality

Workshop Idea Book (Taunton Woodworking)
- Top-tier performance in real-world testing
- Premium materials and exceptional build quality
Workshop Idea Book (Taunton Woodworking)
- Top-tier performance in real-world testing
- Premium materials and exceptional build quality

Making and Breaking the Grid, Third Edition: A Graphic Design Layout Workshop
- Top-tier performance in real-world testing
- Premium materials and exceptional build quality
Making and Breaking the Grid, Third Edition: A Graphic Design Layout Workshop
- Top-tier performance in real-world testing
- Premium materials and exceptional build quality